
How to remove battery from Acer laptop?
You cannot expect to move around with a laptop if its battery isn’t in good shape. Unusual shutdowns can make you stay behind schedules. So, you must get the battery repaired or replaced. But, before taking any step, you must know how to remove it. So, in this article, we’ll explain how to remove battery from Acer laptop.
You must know that every laptop includes two batteries.
- Main Power Battery (allows the entire system of the laptop to function)
- Complementary Metal Oxide Semiconductor battery – CMOS (powers and maintains the BIOS of your laptop)
So, let’s see how you can disconnect both these batteries in an Acer laptop.
How to remove Acer laptop battery- Main Power Battery
It is essential that you backup your data to an external drive to prevent losing important saved files and data. Now, follow our step-by-step guide as it will help you remove the battery.
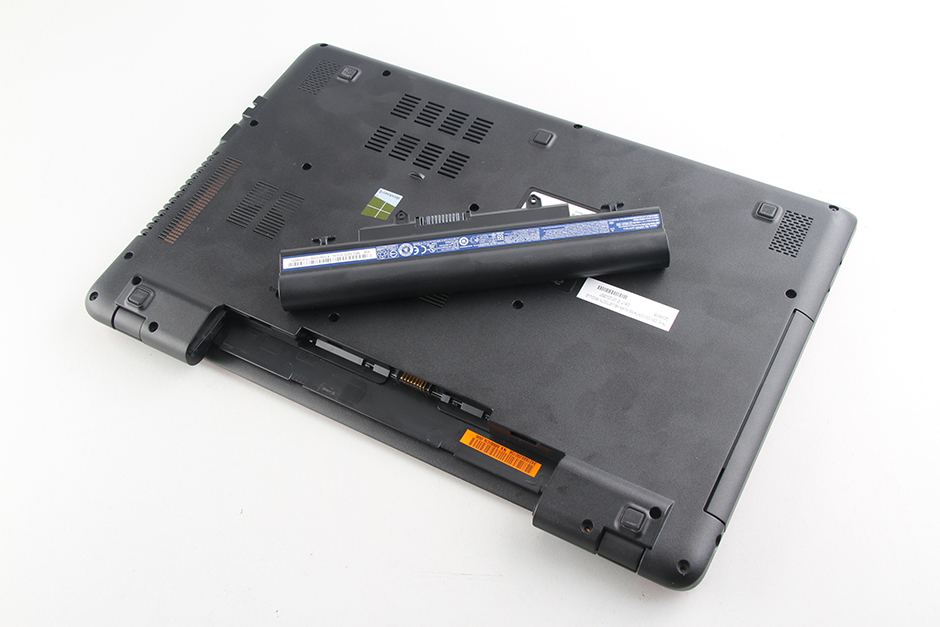
Step 1: Firstly, shut down the laptop. Secondly, detach it from the charger and other wires and cables.
Step 2: Now, close the screen and turn it upside down.
Step 3: You’ll find clasps that keep the battery fixed in its place. Slide those clasps and do not release them until you take the battery out.
Step 4: Grab the battery and pull it out. Then, release the clasps.
Step 5: Wipe the battery cell clean before putting the new battery inside.
Note: To put the battery back, follow the same steps. Also, once you place the battery in its cell, you’ll hear a clack that ensures it is fixed in its place alright.
How to remove Acer laptop battery- CMOS (Complementary Metal Oxide Semiconductor)
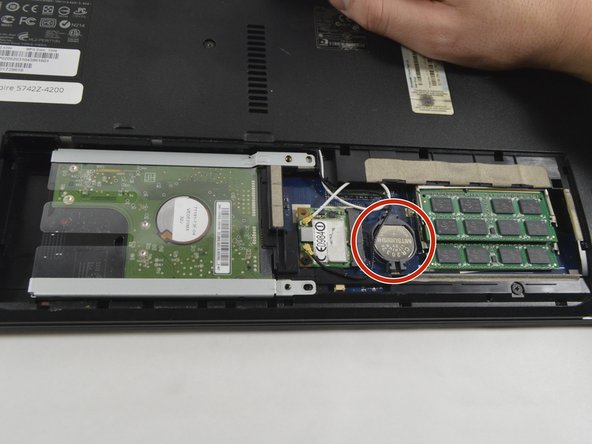
Removing a CMOS battery might be challenging, thanks to the disassembly part. But, if you can successfully pull it off, the rest of the Acer laptop battery removal process becomes straightforward.
Step 1: Turn off the laptop and remove the battery adapter.
Step 2: Take the main battery out from the bottom.
Step 3: Take a flat-head screwdriver and remove the framework by unfastening the screws present on the backside.
Step 4: When the backside comes off, you must turn it over carefully to have the front side on top again.
Step 5: Remove the keyboard from the top and fully extend the screen backwards. If you do not want to remove the keyboard entirely by taking out the ribbon cords seated in the system, you can lift the loosened keyboard and gently put it on the laptop screen to access the motherboard.
Step 6: Now, locate the CMOS battery on the motherboard and remove it. If it’s located beneath the motherboard, you’d have to undo the bolts to let it loose and turn it over to reach the CMOS battery.
Step 7: Ensure the safe removal of the CMOS battery from its compartment by using the flat screwdriver to push it upwards.
Step 8: Place the new CMOS battery in its place.
Step 9: Assemble all the components of the laptop that you removed in the process of locating the battery back to its original place.
Acer Aspire v5:
The steps mentioned above should help remove the battery. However, different models of Acer require different steps to remove the battery. In some designs, the main power battery is located under the framework. Let’s see how to remove the Acer battery from the Aspire v5.
Step 1: Power off the laptop and remove all cords. Flip it upside down.
Step 2: Use a screwdriver to unfasten all the bolts present at the back.
Step 3: Locate a black rubber tab at the bottom and remove it. You’ll see another screw which will need removing.
Step 4: Now, you’ll be able to see an SD card slot on the right side of the laptop. Find a black plastic section and slide it out of the slot.
Step 5: Use a spudger and anything with a sharp head to pry open the framework of your laptop. Now, you have access to the motherboard.
Step 6: Use a screwdriver to remove the two bolts securing the battery. Use the spudger to lift it upwards.
Step 7: Now, remove the battery from the motherboard.
Note: The exact steps allow you to take out the battery from your Acer Aspire e15 model.
Acer Nitro 5

The steps for removing the battery from Acer Nitro 5 are pretty similar to what we have discussed before. However, there are slight variations.
Step 1: Shut off the laptop. Remove the charger and flip the laptop over.
Step 2: Remove the hard drive and RAM first.
Step 3: Unfasten all the screws present on the backside of the laptop.
Step 4: Use a screwdriver/spudger or anything available with a sharp edge to take off the laptop’s framework.
Step 5: You will find the battery attached with cables to the motherboard. There will be plastic tape on it. Remove the tape and detach the battery cable from the motherboard.
Step 6: There will be two bolts holding the battery in its place. Unfasten those bolts.
Step 7: Now, take the battery out. You’ll also find the CMOS battery under it.
Acer Aspire 3:
Follow these steps to remove the battery from Acer Aspire 3.
Step 1: Shut down the laptop and power off the adapter. Ensure no devices or cables remain attached during the battery removal process.
Step 2: You will locate the RAM modules on the right side. Use a screwdriver to unfasten the bolt and open the cell using a spudger or anything with a sharp point.
Step 3: Press each side of the RAM to release it from the holders. Then, pull it out softly.
Step 4: Now, you must remove the hard drive. Use the same screwdriver to detach the bolts and open the framework. Detach the cables to pull out the hard drive.
Step 5: Now, unfasten all the screws that are present on the backside, so you can take off the body and access the motherboard.
Step 6: Use a spudger or screwdriver to open the body.
Step 7: You can now see the battery. Detach the small chip connected to the battery and the motherboard. Be careful not to break the delicate wires.
Step 8: Now, take the battery out.
Conclusion
The Acer laptop battery removing process includes steps that are quite alike yet vary depending on the model. So, before you break open the backside of your laptop, you must know the specific instructions for your particular model. Causing any damage during repairs might make your warranty null and void especially if it’s a recently bought laptop. So, be careful while removing the laptop battery.
Contact us for further inquiries.