
You can use Time Machine (a built-in app in Mac by Apple to restore data) or third-party software. Let’s see how you can backup data using Time Machine.
Step 1: Attach an external storage device to your iMac or MacBook
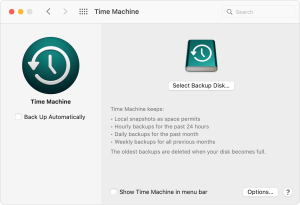
Step 2: Once you connect the storage device, a pop-up window will ask you how to use it. Click on the option “Use as backup disk.” If the pop-up window doesn’t appear, you can go to Time Machine manually. Click on the Apple menu, go to system preferences and choose Time Machine. Then click on the “Select Backup Disk” option and tap on your external device.
Tip: Your external storage device should be compatible with Apple. For example, the disk would need reformatting if the files show as “read-only” on the hard drive and do not conform to the Time Machine’s format.
Step 3: Time Machine will automatically backup all files, apps, photos, videos, and other data. You’d have to be patient, as it might take longer to backup everything.
Mac users are supposed to follow some extra steps before resetting. And that includes logging out of all active and licensed apps. Look at the guide below.
1- Shut off FileVault:
Go to the Apple menu, and click on the “System Preferences.” Then select “Security & Privacy.” Choose ‘FileVault‘ and click the lock icon to unlock it. Enter your Administrator account ID and password. At last, turn off FileVault.
2- Deauthorize iTunes:
Go to iTunes on your Mac. Tap on “Account” and select “Authorizations.” Then click on “Deauthorize This Computer.” Enter your Apple ID and password to proceed and tap on “Deauthorize.”
3- Sign out of iCloud:
Open the Apple menu, and go to “System Preferences.” Select “iCloud” and click “Sign Out.” Also, confirm that you want to remove data from your Mac.
4- Log out of iMessage:
Go to iMessage and tap “Messages” in the Menu bar. Click on “Preferences” from the drop-down options. Select your iMessage account and choose “Sign Out.”
5- Remove Touch Bar Data:
Turn on or restart your Mac. Hold the “Command + R” keys. Go to “Utilities,” then choose “Terminal.” Then type: xartutil –erase-all and press “Return.” At last, type: yes and press “Return” again. Go to “Terminal” and choose “Quit Terminal.”
Now, you’re all set for resetting your Mac. So, let’s dig into the step guide to achieve it.
Step 1: Restart your iMac/Macbook Pro in Recovery Mode
- Go to the Apple menu and choose “Restart.”
- Press the “Command and R” keys together to see the macOS Utilities window as the system restarts.
Step 2: Erase data from Mac hard drive
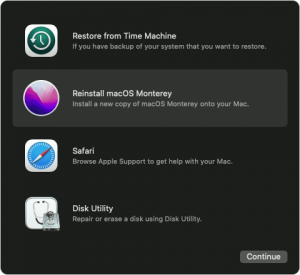
- Select “Disk Utility” and tap on “Continue.”
- Select your startup disk (named Macintosh HD) and click on “Erase.”
- Pick “Mac OS Extended (Journaled)” from the menu and select “Erase.”
Step 3: Download macOS to your iMac and MacBook Pro
- Open Disk Utility.
- Choose “Reinstall macOS.”
- “Confirm” to reinstall macOS and follow the pop-up instructions to complete the procedure.
The factory reset should be successfully done by now. You can safely move to the last point, which is the recovery of your backup files.
It’s time to restore your Mac from Time Machine. Follow the below steps to get your files back successfully.
Step 1: Attach your Time Machine backup storage device to your iMac or Macbook Pro and turn it on.
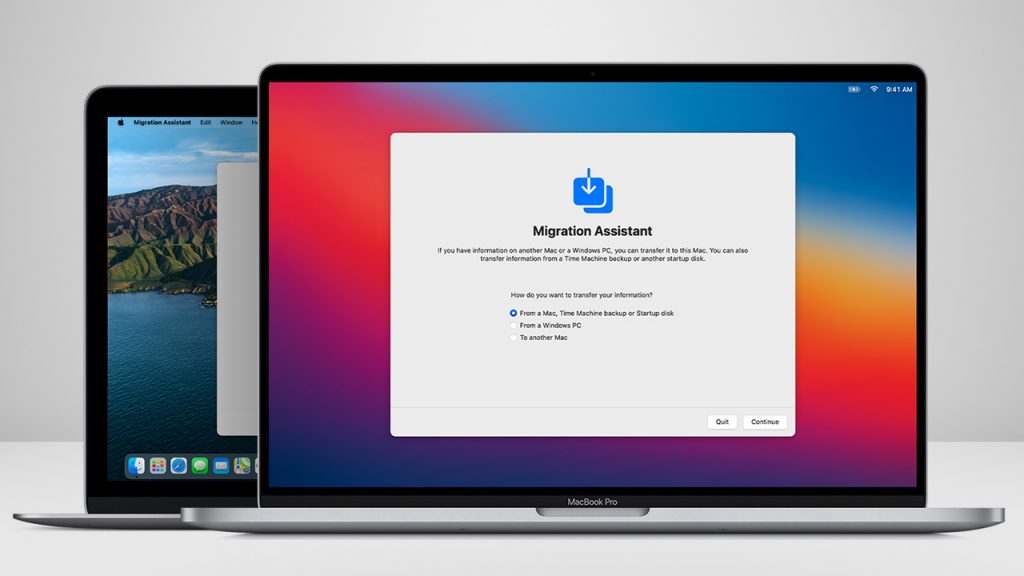
Step 2: Open “Finder.” Select “Applications.” Then go to “Utilities,” click on “Migration Assistant,” and choose “Continue.”
Step 3: When the Migration Assistant window pops up, select the “From a Mac, Time Machine backup, or startup disk” option and tap “Continue.”
Step 4: Select your Time Machine backup and tap “Continue.”
Step 5: Choose the backup you made previously from the list of available backups.
Step 6: Select the category/categories option to transfer and choose “Continue.” Lastly,
let the process finish.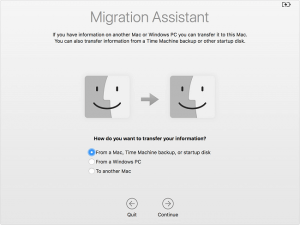
This guide will allow you to factory reset all macs, including iMac, iMac Pro, MacBook Pro, and MacBook Air. If you need further help, contact us for consultation.